
A Sense of Surroundings: Lesson on Maps (Maths, Class V)
By Narendran V
This article describes my classroom experience of teaching the mathematics lesson ‘Mapping Your Way’ in class V. The practice is seen as different from how regular topics are taught and methods used in most maths classrooms. My reason for choosing this topic is because of its uniqueness among other topics in the maths textbook.
When we think of mathematics, we think of numbers and number operations, and we may extend it to include measurement and patterns. But in our NCERT textbook of maths for classes I to V, there are topics, such as Where to look from, Building with bricks, and Fish tale. Why do we need these lessons and what is the understanding students get from these? What are the skills they learn?
Most teaching practice involves dealing with one concept from a chapter – the plan, practice, and assessment. But these topics have multiple concepts which connect the learning of maths to day-to-day life situations. The descriptions in the lessons also combine several concepts, for example, for the lesson A Trip to Bhopal, the concepts considered are distance measurement, money computation, spatial understanding and so on. Teaching these concepts separately with relevant examples seems easy but as a hybrid concept, it requires teachers a lot of thinking on the part of the teacher to make the lesson easily understandable for students.
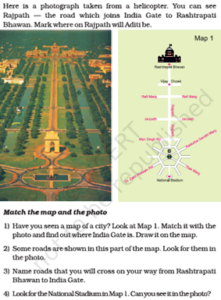
In the topic, Mapping Your Way, number and number operations play a minimal role; the focus is on the visualisation of one’s surroundings, which involves the concepts of spatial understanding and visualising the distance and direction of an object. The topic is different from regular maths concepts and is generally neglected because teachers of maths need to create a different, perhaps a new, practice to transact it in their classroom.
Preparation
The lesson was planned for three days based on the knowledge and understanding of the students. The plan included the following:
- Discussion on directions – North, East, South and West and eliciting facts based on it.
- Drawing the classroom – To make students visualise and understand their classroom and surroundings, they were made to note the direction of each object in the classroom, picture it in their mind and draw a picture.
- Drawing the school – Same as the point above but the visualisation extended to the entire school, building a mental picture of it and then drawing it.
Understanding directions
The main objective of the lesson was for students to understand how to read a map. For that, the core understanding includes knowing the directions (North, East, South and West) so I started my discussion with this. The students seemed to know the terminology of directions, but the visualisation was missing, which means that they could not connect this with, say, the universal fact of the sun rising in the east.
This misconception was observed when I asked them to point ‘East’ to me. They pointed to their left. This is another example of not just how numbers and number operations are taught in the traditional method but also how concepts, such as directions, are taught. As directions are usually taught using our body as a compass with the head as North, left hand as East, right hand as West and feet as South. This body compass fails to connect with the directions in the real world.
I probed them by asking them to show me the direction in which the sun rises. Clearly and loudly, they said ‘East’ and pointed in the direction correctly. I turned their body compass to the East and then they were able to visualise and point to the other directions correctly. Following this understanding, I began with the visualisation of the classroom.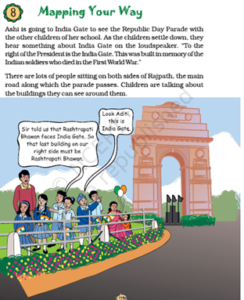
Activity 1: Drawing a classroom map
I asked them to visualise the classroom and draw it on paper. The time given was 20 minutes. The main purpose of giving this activity was to make the students connect the previous discussions on ‘direction’ with object identification and then map them sequentially in the correct direction with reference to their position (seat).
So, to draw, I first asked the students to assume that the classroom has four sides and the paper has four sides and asked them to draw the physical objects around them on the correct sides of the paper, and then to draw their own bench in the centre of it.
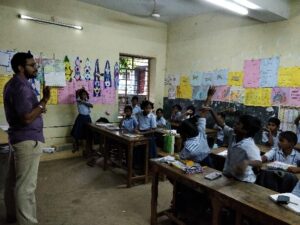

Giving instructions and students drawing their maps.
Observations
In this activity, students presented their own perspectives in their drawings. Some of them drew everything present in the class. Some of them drew only the important things they could see, and some drew only the blackboard and the benches. It was observed that some of their drawings were quite detailed, and some were abstract, but all the students were confident of the position of various elements in their drawings. To make their maps more interesting, I asked them to do the following:
- Show how you come into the classroom and sit in your place. They represented the pathway by drawing a line from the entrance to their seat.
- I went and stood at a random place and asked them to show my position on their maps.
Almost all of them got it correct, only one student showed me in the exact opposite direction. This was due to this student visualising the classroom from a top view since the map is in 2D. To avoid this misunderstanding, a few placement-related questions were asked:
- Spot the teacher’s chair and compare the distance between the blackboard and the chair.
- Which is the first object next to the blackboard?
These questions gave the child better clarity on how to spot an object/person with respect to other objects/persons around them.
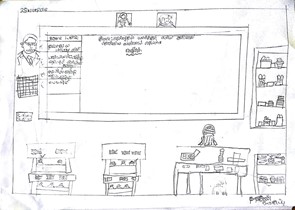
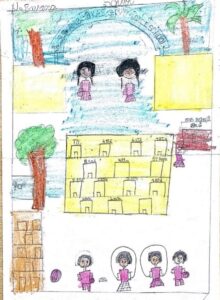
Some drawings by the students visualising their classroom.
Limitations in drawings
1. In most of the drawings, while the position of the objects was correct, the size and number of these were not exact or close to it. This shows that the children were not able to visualise the objects based on size and numbers.
2. Drawing the number of benches up to where they are sitting shows that they could only visualise the things in front of them and not around.
Based on the above observation, I had a discussion on these aspects with the children. So, going forward, it was decided that they would also take into account the size and quantity of all objects around them and not just those in front of them.
Activity 2: Drawing a school map
The purpose of this activity was to make them visualise a larger space, which may not be visible to them all at once, but they may be familiar with various ‘landmarks’ on it, such as the school entrance, playground, trees, building, restrooms, and finally, the classroom they were in. We included colours in this activity to make it more interesting for them.
Observations
The students started to draw the map of their school. I gave them some pointers, such as finding out how many classrooms there are and in which direction the entrance of the school, the staffroom and their classroom are. The students took note of these and then started to visualise and draw.
Some students were not fully aware of their school surroundings and were thinking of what to draw first. I gave them the example of the previous class activity, which made it easier for them to begin. I also drew a sample on the blackboard, pointing to how each object was optimised with respect to the overall size of the drawing, and that they must keep this in mind while drawing on their sheets.
Then, after the students drew, we analysed each drawing and categorised them into the following four categories.
- Some drawings were very detailed – making the entrance, school building, pathways to classrooms, two floors of the school, and students playing in the playground – which made it easy to identify the areas.
- Some students concentrated on the entrance and only the classroom.
- Some students gave more prominence to the playground.
- Some drawings were abstract, but their directions were correct.
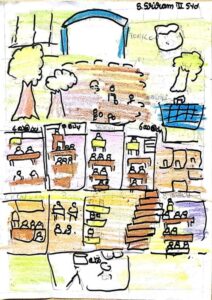
Some drawings by the students visualising their school
Along with these, it was interesting to see that some students had added additional characters to their drawings, such as students playing on the grounds, the inside of classrooms, students coming to school, and a spot where a puddle generally forms. We had a discussion on these and students mentioned that the school should not look bare but should have people who represent it.
Since the size and number ratio of objects in some students’ drawings were still not correct, we continued our discussion on these by pointing to each object and asking them whether the position of each object/landmark in relation to those around it was correct or not. They made some changes as they understood this better and came up with specific points to spot the correct position. For example, one student said that the ground was in front of the building and not behind it and it was next to the entrance.
Further, to make them understand where their classroom in the school drawing should be, I asked the students to think and draw the path from the entrance to the classroom. Here, most of the students were able to draw the path correctly with reference to the entrance and their classroom in the school building.
Some Insights
Learnings
- These activities gave the students an idea about how to read and draw a map.
- The plan helped the teacher understand an effective pedagogy for a mapping lesson using art and colour.
- The involvement of the students in this pedagogy was of a greater level when compared to a theoretical transaction of the subject.
Misconceptions
- Students visualised objects or structures from one side only, either left and right or front and back.
Reflections
- Most of the students were able to understand directions based on their own position. They mostly focused on the objects in front of them, which means they needed more practice in observing objects in all four directions before a mapping activity. This will help in addressing their problem with the size and number ratio in their drawing. This may also be seen as a challenge in turning a 3D visual into a 2D picture. A solution to this can be, say, in the case of the drawing of a classroom, the teacher can make students draw each side of the classroom on separate sheets and then join the sheets. A discussion on this would help address the questions they may have.
- Although a lot of them added ‘live’ characters (such as students) and minor details, such as the spot where water stagnates, they needed to pay more attention to directions. This can be overcome with the help of more discussions on directions and whether something is in front of or behind an object/building and accordingly locating these on a map that has the directions – North, East, West and South – clearly marked.
- Posing questions, such as ‘Who is to the left of you?’ (in a classroom), ‘What is in the North of the school?’ will help the students to visualise a map better.
Conclusion
Visualisation is an essential skill that needs to be developed in students. Without it, imagination and ideas cannot flourish. Lessons like this one are included so that visualisation skills can be developed but are mostly ignored in the teaching. These lessons can be taught through interesting activities to make the class and the teaching equally enjoyable. The activity used in this lesson included gross motor, fine motor and psychomotor skills that also help teachers to better understand their students.
Author
Narendran V is a Resource Person at District Institute, Azim Premji Foundation, Puducherry. An engineer by qualification, his interest lies in exploring, learning and teaching mathematics.
